No battle plan survives contact with the enemy
Plans are nothing, but planning is everything
Field Marshal Helmuth Graf von Moltke
 I believe that Agile Project Management provides certainty of delivery. Planning is what lets us answer the question “When will you be finished?”. Planning is, however, just the start of the process. As Moltke pointed out planning is more important that the plan because once you start the project you’ll find the plan is wrong and you have to adapt. All plans need revisiting and you will have to use Agile Project Control, Agile Change Management, and Agile Risk Management to get the promised certainty of delivery.
This article covers traditional project planning, agile versus traditional project planning, Release Planning and Timebox Planning.
Note: “Agile Estimating and Planning” by Mike Cohn of Mountain Goat Software is the best book on Agile planning there is. If you read one Agile book then read this one.
Traditional Project Planning
Planning is one of the five project management process groups in the Project Management Body of Knowledge (PMBOK) from the Project Management Institute (2004).
According to Kernzer (2003, cited on Wikipedia: Project Planning)
Project planning is part of project management, which relates to the use of schedules such as Gantt charts to plan and subsequently report progress within the project environment.
The traditional project planning process comprises these steps:
- Define the project scope
- Identify appropriate methods for completing the project
- Create a Work Breakdown Structure of the tasks to complete the work
- Estimate those tasks
- Map the logical dependencies between and identify the critical path.
- Calculate the resources needed
- Plot the tasks on a project schedule
- Calculate the total cost.
- Optimise by trading off resource usage/cost and project duration.
- Baseline the plan.
- Measure progress against the baselined plan throughout the life of the project.
The project manager puts together the project plan. They may or may not draw upon others to help.
Traditional Project Plan
According to PRINCE2 (OGC: Project Plan) the purpose of a project plan is to:
A statement of how and when a project’s objectives are to be achieved, by showing the major products, milestones, activities and resources required on the project.
It is used as a baseline against which to monitor project progress and cost stage by stage.
The Project Management Body of Knowledge (PMBOK) 2000 Edition (cited in Wikipedia: Project Plan) defines a project plan as:
A formal, approved document used to guide both project execution and project control. The primary uses of the project plan are to document planning assumptions and decisions, facilitate communication among stakeholders, and document approved scope, cost, and schedule baselines. A project plan may be summary or detailed.
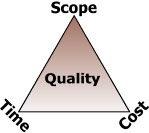 The “scope, cost, and schedule baselines” part of this is worth dwelling on. Project sponsors allocate a scope, cost and time to a project with an implicit “high quality” attribute underlying this. In traditional project management these are baselined, i.e. locked down, at the start of a project. The project manager’s job is to ensure the project delivers the desired scope, in the time allowed, within the budget allocated, and to the quality aspired to. If any of these attributes shifts from the baseline then Change Management cuts in. Typically in a traditional project that means that new features (scope) are requested and the project takes longer and costs more or quality suffers.
OGC: Project Plan goes on to suggest the content of a project plan:
- Plan description, giving a brief description of what the plan covers
- Project prerequisites, containing any fundamental aspects that must be in place at the start of the project and any that must remain in place for the project to succeed
- External dependencies, identifying the products that must be provided to the project so that it can continue but which the Project Management Team has no authority over and so cannot ensure delivery fits the project requirements.
- Planning assumptions concerning availability of resources, skills/competency requirements etc
Project plan, covering: - Project level Gantt chart or bar chart with identified management stages, e.g. milestones and control points
- Project level product breakdown structure
- Product descriptions, defining what the project will deliver including the required quality level
- Project level activity network and product dependencies
- Project level table of resource requirement
- Requested/assigned specific resources
- Project change budget (if appropriate)
- Project level tolerance, for both time and budget as triggers for contingency plans and escalation processes
- Contingency plans, explaining how it is intended to deal with the consequences of any risks that materialise
Prince2 breaks with tradition by using a product breakdown structure. More commonly project managers use a Work Breakdown Structure (WBS). A WBS is “A task-oriented detailed hierarchical breakdown, which defines the work packages and tasks at a very low level” (Ohio State University: Office of the CIO).
Traditional Project Schedule
One of the suggested contents from the OGC: Project Plan is worth repeating:
- Project level Gantt chart or bar chart with identified management stages, e.g. milestones and control points
“Project plan” is often incorrectly used synonymously with “Gantt Chart”. In fact a Gantt Chart is one type of project schedule and the schedule is only one component of the project plan. As we saw above the full project plan is much bigger.
A project schedule maps two variables:
- effort required (i.e. from the tasks and associated estimates)
- effort available over time (which I call capacity)
From this you can tell how long it will take to finish each task and hence the project as a whole.
The distinctive feature of traditional project schedules is that they attempt to be very detailed. Every task in the entire project is meant to be plotted on the schedule at the beginning of the project. Agile does it differently.
See Agile Project Scope and Agile Project Estimating
Agile versus Traditional Project Planning
In some respects the traditional planning process, particularly the idea of required effort mapped against available effort in a project schedule, applies in the Agile world. But there are some key differences.
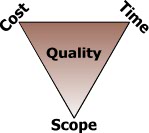 The starting point is that unlike a traditional project where scope, cost and time are all supposed fixed, in an Agile project time and cost are fixed which allows scope to flex. Because scope can change the planning mechanism must support this.
One of the implications of that is the monolithic project schedule of traditional approaches (usually in the form of a Gantt chart) is replaced by layers of plans including a Release Plan, a series of Timebox Plans, and informal daily plans. I, like most Agilists, loath Gantt Charts but I’ll explain below where I might use one in an Agile project.
The Work Breakdown Structure (WBS) is also discarded. The WBS looks at the project as a series of fine grain technical tasks whereas Agile sees the project as a series of product increments. The top level Agile Project Scope are User Stories and these are scheduled directly into the Release Plan to become the product increments. Planning the fine grain Tasks is deferred as late as possible – until Timebox Planning. This means we don’t bother doing planning for something that never happens.
The Agile Team is more involved in planning. It isn’t just a project manager thing. For example the whole team does Agile Project Estimating. The Project Manager is, however, still responsible for getting the planning done.
And you’ll rarely see the other components of a traditional project plan in an Agile project.
Multiple Layers of Plans: The Planning Onion
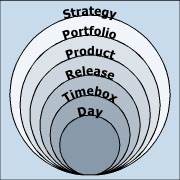 The Agile methods are fairly unified on the approach to project planning although the Terminology differs. Mike Cohn’s Planning Onion (Cohn, 2006) beautifully illustrates the levels at which an organisation must plan its activity. The Planning Onion shown is adapted from Mike’s original to make the Terminology consistent with the rest of this website. An Agile Team plans at the lower three levels: Release, Timebox and Day.
Agile Project Managers plan at multiple levels because each level has a different planning horizon and the shorter the horizon the greater the detail. The Day Plan is most detailed of the plans but is only concerned about current activity (yesterday and today). The Timebox Plan is only interested up to the end of the current Timebox. The Release Plan is concerned about the activity through to the end of the project and is fairly high level compared to the other two plans.
 Release Planning
A Release is a piece of development where the customer gets some new software as part of a major public release. Releases can be from 2 weeks to 6 months, but are usually 3 months long. Each Release will have one or more Timeboxes. These are the external releases, as opposed to the releases at the end of each Timebox which might be just for internal consumption.
Although originally created in Agile Project Initiation the Release Plan is updated throughout the project, typically after each Timebox Review.
Preparing for Release Planning
The Product owner has to come to the Release Planning Meeting armed with User Stories.
It is also a good idea to give each Release a Release Goal. A Release Goal describes the purpose of the Release and essentially summarises the functionality of the User Stories to be included. This can be help later when you’re having to make hard decisions about what is in/out-of-scope.
Release Planning Meeting
The entire Agile Team attends. The Product Owner describes the Project Goal and/or Release Goal, and the associated User Stories including their relative priority. The Agile Team then comment on the risk associated with each User Story and, if possible, give an estimate of the effort to develop the User Story. The team may add, update, delete User Stories during the meeting. The Product Owner then has the option to repriortise the User Stories based on the value to the organisation, the risk, and the effort to develop.
The main outcomes of the Release Planning Meeting are
- Estimates for each User Story, I favour Story Points, that is likely to be scheduled.
- The relative priorities of the User Stories.
From this information, plus Velocity, the Agile Project Manager can put together the Release Plan.
 Release Plan = Bucket Plan
A Release Plan basically comprises requirements (User Stories) in Timeboxes. The Product Owner prioritises the User Stories with the higher priority items going into earlier Timeboxes, lower priority items getting scheduled later, and very low priority items being declared out-of-scope.
Each User Story has an effort estimate (see Agile Project Estimating) and the team capacity (Velocity) limits how many User Stories can fit. Making sure that the team capacity is sufficient to do the work assigned to each time period – in our case Timeboxes – is traditionally called Levelling.
Release Planning is bucket planning in the sense that each timebox is a bucket with a certain size. You can put requirements into the buckets but if a bucket is full, you can’t put anything more in it. You have to move the overflow to another bucket or discard it.
The Release Plan can cover one or more Releases. DSDM has only one Release per project which is also the model we ended up with at the BBC as well as we found it difficult to plan further out.
In contrast when I was running Agile projects in software house for external customers I found it essentially to have a Release Plan that covered the entire planned scope including multiple public Releases; scope was tied to contractual obligations and I needed one document, the Release Plan, to define the entire scope. I also retained out-of-scope items on the Release Plan, tagged somehow as out-of-scope. Once again this was particularly important in a customer-supplier situation where scope discussions were common.
A Scrum style Product Backlog a list of prioritised User Stories but it is not a Release Plan until it has a Timebox number against each User Story.
Nor is a Release Plan an aggregation of the Timebox Plans. Items on the Timebox Plans are technical Tasks whereas the Release Plan has User Stories which are a higher level of granularity and usually reflect desired user functionality.
Velocity as a Measure of Team Capacity
Agile processes promote a sustainable pace and one of the Principles Behind the Agile Manifesto refers to this:
Agile processes promote sustainable development.
The sponsors, developers, and users should be able
to maintain a constant pace indefinitely.
The aim is to Burndown not Burnout. The team should be able to maintain a constant pace rather than committing to prolonged periods of over-time in order to meet commitments.
Velocity is the measure of team capacity used for a Release Plan. Velocity is the total size, often in Story Points, of the User Stories completed in a Timebox (see Agile Project Estimating).
During the project the Agile Project Manager measures actual Velocity, i.e. the total size of the User Stories actually completed. You have to do this at the end of a Timebox but it can happen at any time (see Agile Project Control). This on-going measurement is what makes Agile Project Management empirical – it is based on data not wishful thinking.
Using the principle of Yesterday’s Weather (Beck & Fowler , 2001) the actual Velocity is used to predict the future Velocity. You will have to adjust the predicted Velocity based on your knowledge of staffing levels in the future (e.g. Agile Team ramping up/down, annual leave, operational responsibilities, etc).
The Agile Project Manager continually updates the Release Plan to reflect the predicted Velocity. This tells you whether you’re on track to deliver the Agile Project Scope in the time available. If you are on track then everything is ok. If your Velocity is higher than expected you’ll either end early or you can add requirements. If your Velocity is lower than expected you’ll have to drop requirements and Agile Change Management comes into play.
Velocity is contextual: it is specific to that team, at that time, working in that technology, in that problem domain, and is based on how they do Agile Project Estimating. Because of the contextual nature of Velocity it is fairly meaningless to try to compare the Velocity measures of different teams.
Predicting Velocity is difficult during Agile Project Initiation because you won’t have Yesterday’s Weather to work from. If you’re lucky you will have historical data, perhaps the same team worked on a similar project recently, to use to get you going. Or perhaps some development activity, a prototype/spike or some such, during Agile Project Initiation will give you some inkling of the predicted Velocity. Otherwise you’ll have to guess. Guessing isn’t so bad in an Agile project as Agile Project Control means you’ll quickly know what the actual Velocity is and adjust accordingly.
Generally we’re not interested in the contributions of individual’s to the team Velocity. The only time you might be interested in scheduling individuals is where a specialist skill is required but the person is in demand from other projects. The specialist will have to multi-task – something I normally avoid.
Coping with Operational Issues
Many Agile Teams have to cope with operational issues in addition to their development work. This is inconvenient but reality. Different Agile Teams include the operational work in their Release Plan in different ways. After some experimentation I found there are three general approaches to this problem:
- Lower predicted Velocity to allow spare capacity to do ad hoc operational tasks.·
- Include explicit operational items as User Stories in the Release Plan (and/or Timebox Plan) and schedule them as normal.·
- Have whole Timeboxes dedicated to operational issues. During normal Timeboxes no work is done on operational issues; any operational issues are just added to the Release Plan as User Stories to be dealt with in the future operational Timebox. When there are sufficient operational issues the Agile Team spends an entire Timebox dealing with them.
All of these methods have pros and cons. Just pick one that suits your context.
Buffers to Create Safety
Buffers are a concept from Eli Goldratt’s Critical Chain Project Management approach within the Theory of Constraints (Goldratt, 1997; Goldratt: Critical Chain; Wikipedia: Critical Chain Project Management; Wikipedia: Theory of Constraints). Essentially buffers are a way to trade of uncertainty (i.e. risk) with time. The greater the uncertainty the larger the time buffer required.
In traditional project management the critical path is the sequence of project network activities which add up to the longest overall duration (Wikipedia: Critical Path Method). The Critical Chain is similar but includes consideration of resource constraints. Goldratt: Critical Chain says:
the Critical Chain is defined as the longest chain [not path] of dependent tasks. In this case, ‘dependent’ refers to resources and resource contention across tasks/projects as well as the sequence and logical dependencies of the tasks themselves.
If resources are always available in unlimited quantities, then a project’s critical chain is identical to its critical path (Wikipedia: Critical Chain Project Management).
The theory is that to get the project delivered faster you focus on shortening the Critical Chain, even if that means, at certain times, some people are sitting around doing nothing or work on a component that has stalled. Buffers are used to create safety as key points in the critical chain. Safety being, of course, the opposite of risk. These buffers are the moments when, potentially, people are doing nothing or work on a component has stalled.
There are three types of buffer in Critical Chain Project Management:
- Project Buffer
- Feeding Buffer
- Resource Buffer
Cohn (2006) has quite a lot on buffers applied to Agile software development so have a read there if you want to know the deep detail. I’ll just give a quick overview of the buffers.
Project Buffer = Project Contingency
I always left a timebox or two at the end of my Agile projects with no User Stories assigned. This was my contingency. I was always a bit concerned because you’re not meant to have contingency in an Agile project. Then I read about buffers in Cohn (2006) and re-read the material I had on the Theory of Constraints (Goldratt, 1997) and it all became clearer. Goldratt: Critical Chain describes a buffer called the Project Buffer. Cohn (2006) calls the same thing a Schedule Buffer. Whatever you call it it is the way to handle contingency in an Agile project.
According to Goldratt: Critical Chain:
A project buffer is inserted at the end of the project network between the last task and the completion date. Any delays on the longest chain of dependant tasks will consume some of the buffer but will leave the completion date unchanged and so protect the project. The project buffer is typically recommended to be half the size of the safety time taken out, resulting in a project that is planned to be 75% of a “traditional” project network.
Goldratt’s “safety” is contingency.
The estimates for the User Stories created in Agile Project Estimating are meant to have no contingency. None. Zip. Nada. And I will repeat, no contingency. Agile estimates are meant to reflect the likely time to do the work. We expect that 50% of the time we’ll exceed the estimate and 50% we’ll run under. On average we’ll be spot on. The lack of contingency on each piece of work means the Agile Team is less likely to dawdle.
However if you add up all those 50% probabilities that means we’ve only got 50% chance of being “on time” for the project as a whole, which is a problem. The Project Buffer is what moves us from 50% probability of being “on time” to our desired certainty of delivery (or at least 75% chance).
Traditional estimates include a contingency. Goldratt (1997) assumes there is a 90% chance that the work will be within these estimates. The difference between the 50% Agile estimate and the 90% traditional estimate is the contingency. The calculation for the project buffer is to sum all of the contingencies, then halve the total. That gives the size required for the Project Buffer.
Strictly speaking the Project Buffer is used to soak up delay on items in the Critical Chain. Not all delay, just delay on the Critical Chain. But it is simpler to think of the Project Buffer as the place to put User Stories that get dropped during Agile Change Management. They’ll still happen, but later.
Cohn (2006) has a couple of tips:
- Don’t bother with a Project buffer if you’ve less than 10 User Stories
- Be wary of a Project Buffer less than 20% of the total effort as it won’t give enough protection
Feeding Buffers for Component Dependencies
Strictly speaking User Stories are meant to be written to be entirely independent (Beck, 2000), but in reality there are often dependencies you can’t avoid. For example when you’ve got two teams working in parallel and one of them needs a module from the other.
Dependencies are clearly highlighted on a Gantt chart, but aren’t so easily visible in a Release Plan in a spreadsheet. But all is not lost; there is a fairly simple way to deal with them.
Dependencies are shown in the Release Plan of both teams. The team:
- supplying the component has a feeding buffer in the Timebox where they need to deliver the component
- receiving the component has an User Story that represents the work to receive the component in the same or a later Timebox
A Feeding Buffer is a mechanism to get the supplying team to deliver early and gives the supplying team some spare capacity to ensure they deliver the component even if something goes wrong. The mechanism is to lower the Velocity of the supplying team during the Timebox they must deliver the component.
The User Story on the receiving side might just a be flag that some work is going on elsewhere, e.g. “API from Search Team; estimate = 0”. More often, however, some work is required by the receiving team, e.g. “Integrate Search API; estimate = 1 day”.
You only need feeding buffers into items on the Critical Chain. If a delay of the supplying team won’t hold up the project, then you don’t need a buffer.
You size a Feeding Buffer in the same way you’d size a Project Buffer (see below), after all the work required to build the component is a project itself. If the Feeding Buffer is larger than a single Timebox of the supplying team then you should split the delivery into multiple parts to reduce the integration risk.
Resource Buffers
Resource buffers are used to ensure the appropriate people and skills are available to work on the Critical Chain tasks as soon as needed. A Resource Buffer is a Feeding Buffer except the constraint is on resource not a dependency on a component. Put the Resource Buffer before the User Story that needs the constrained resource. That has the effect of ensuring the resource, when they are free, is not held up by anything else.
Sizing Buffers
There are four ways to calculate the size of a Buffer. From most precise to least they are:
- “Square Root of the Sum of the Squares” (Cohn, 2006)
- half the size of the local safety removed from the estimates (Goldratt: Critical Chain)
- half the sum of the 50% estimates (Cohn, 2006)
- pick a number
The first two methods require you to get two estimates for each item: the 50% estimate and the 90% estimate. The time between the 50% and the 90% estimate is the local contingency (“local safety” in the Theory of Constraints terminology).
The “Square Root of the Sum of the Squares” method gives the most precise result but requires a bit of math; if you’re a spreadsheet this is no problem. The second method is easier to calculate but slightly
less precise. I favour the second method because it is simpler and less precision does not mean it is less accurate.
The third and fourth methods are arbitrary as they don’t take into account the degree of uncertainty at all. This is a bit odd given a Project Buffer is meant to counter uncertainty.
Format of a Release Plan
Most commonly User Stories are written on index cards (see Agile Project Scope) and are then pinned to a board or kept in a pile on a desk. With some indication of which User Story goes in which Timebox this becomes a Release Plan. Many Agilists are happy with this approach but I prefer to have duplicate systems. Three in fact:
- As index cards on the board
- Titles and estimates in the Release Plan which is usually a spreadsheet (see Agile Project Estimating)
- Titles at least in a task tracking database (see Agile Project Control)
There is an overhead to this but the different formats are for different reasons and I could never quite eliminate any one of them.
My Release Plans are always in a spreadsheet. Not only does this allow me to do some calculations on the data it contains (e.g. levelling team scheduled user Stories and Velocity/capacity) but it also means I can email the document to my customers. It is hard to email index cards. If I had a specialist Agile project management tool such as VersionOne, Mingle, ScrumWorks, etc, I would consider abandoning the spreadsheet.
II also use a task tracking database containing the the tasks for each story. This facilitates sending out emails to individual developers and to the team as a whole, allows me to generate automatic release reports for the operations team and my customer, and gives us a history of what happened when which is important for support. Those specialist Agile project management tools (VersionOne, Mingle, ScrumWorks, etc) are ideal for this but there are other ways to achieve the same effect. At one company we just modified our call tracking system to be the task tracking database. Some of the other Agile teams I’ve managed prefer using a fault tracking database to the specialist tools because the fault tracking database has hooks into their source code repository (specifically Trac and Subversion).
 Timebox Planning
Projects are divided into time-boxed development cycles called Timeboxes. Each Timebox should culminated in the delivery of a delivery of production quality software, although not all of these increments are released to the public. A Timebox is 1 – 6 weeks long, but usually 3 – 4 weeks. The most important thing about a timebox is that the delivery date is fixed.
Each Timebox has a plan of its own created in a meeting at the start of the Timebox and updated throughout the Timebox.
Preparing for Timebox Planning
In preparation for the Timebox Planning Meeting the Product Owner needs to have:
- A list of the the high priority User Stories
- Acceptance tests for each of those User Stories
- Sufficient supporting documentation to describe each User Story adequately.
It is useful for the Product Owner, Agile Project Manager and Technical Lead to have a Pre-planning Meeting to review the candidate User Stories. The Pre-planning Meeting is to check for missing User Stories, split up Epics, and check the team has sufficient capacity to do all of the desired User Stories.
The number of candidate User Stories will be limited by the Velocity of the team. It isn’t worth spending too much Product Owner energy on elaborating User Stories that won’t make it into the Timebox.
The acceptance tests help understand the intent of the associated User Story. They are the way to answer the question “how will we know when the user story is done?” The acceptance tests don’t have to be too complicated just yet. They can be just the name of the test so people get a gist of what the User Story is about. Antony Marcano of Testing Reflections recommends the format “Given <preconditions> when <event> then <result>” for these acceptance tests. If you find you are writing a lot of acceptance tests for a particular User Story it is a sign that you’re dealing with an Epic that needs slicing up. During the Timebox, as development work is progressing, passing these acceptance tests tells us when we are done. The tests don’t need to be automated at this stage.
Supporting documentation can include financial calculations, screen wire frames, a high fidelity prototype, etc.
See Agile Project Scope, Agile Quality Management
Timebox Planning Meeting
The Timebox Planning meeting is to identify and estimate all the tasks that need to get done to deliver the Timebox Goal. Tasks that are not relevant to delivering the Timebox Goal are not added to the Timebox Plan. The whole Agile Team comes to the meeting, including Developers, Testers, the Product Owner and the Project Manager.
At the Timebox Planning Meeting the Product Owner explains the Timebox Goal and the User Stories selected for this Timebox. The Agile Team then:
- Brainstorm the Tasks necessary to complete each User Story
- Estimate the Tasks
- Check that the team has sufficient capacity during the Timebox to do all the Tasks
- Adjust User Stories to fit into the Timebox
Bear in mind that at the end of the Timebox the software must be production ready, i.e. releasable quality. Releasable quality doesn’t mean perfect, it means the Agile Team believe is has sufficient quality to release. This isn’t even the same as passing all the acceptance tests, but that does help. So the Tasks identified must the all the tasks necessary to get the software to this state.
The Velocity at the Timebox level is calculated like the Velocity that for Release Planning but the estimation unit will differ being in Ideal Hours rather than Story Points.
You’ve a choice of three ways to determine the team’s capacity for a Timebox:
- team Velocity based on yesterday’s weather (Beck & Fowler, 2001)
- team commitment (Schwaber & Beddle, 2002)
- individual Velocity based on yesterday’s weather
If User Stories don’t fit into the Timebox they have to be deferred until later, or split into two with one part being done in the current Timebox and the other part being deferred.
Timebox Plan
The result of this activity is a Timebox Plan.
Format of a Timebox Plan
Once again the convention is that Tasks are index cards and then pinned to a board. For many Agile Teams this is the Timebox Plan, but as with the Release Plan I like duplicate systems:
- As index cards on the board
- Titles at least in a task tracking database
I do with for the same reasons I mentioned for the Release Plan. The way I look at it the index cards are the focus of discussion but the task tracking database is the team memory. This facilitates sending out emails to individual developers and to the team as a whole, allows me to generate automatic release reports for the operations team and my customer, and gives us a history of what happened when which is important for support. As mentioned above the specialist Agile project management tools (VersionOne, Mingle, ScrumWorks, etc) are ideal for this but there are other ways to achieve the same effect.
Obviously duplicating systems has synchronisation overheads.
Day Planning
Every day during the Timebox the team works on tasks that will help them achieve their Timebox goal and deliver a production quality release. Day Plans are informal and not written down; they are discussed at the Daily Team Meeting. Remember the three questions of the Daily Team Meeting: What have you done yesterday, what are you doing today, what are the impediments? The first bit is basically status reporting. The second and third question, and the actions that result, are the Day Plan, informal as it is.
When to use a Gantt Chart in an Agile Project
I’m not a picture kind of guy. I like numbers. So when I first got into Agile I, like most Agile advocates, resisted creating a Gantt Chart for my projects despite considerably pressure from senior managers in my company and from customers. As discussed above the Release Plan and Timebox Plans serve the function of the project schedule in an Agile project so there are no really compelling reasons, aside from tradition, to do a Gantt Chart. And there is considerable disincentive to do a detailed Gantt chart – they are time consuming to maintain. I know, I’ve been forced to do it.
None-the-less after some years I came to realise a Gantt Chart can, on occasion, have a part to play in an Agile project. Possible reasons are:
- The paying customer demands it. Or put slightly more positively, the customer is reassured by seeing one. For better or worse Gantt Charts are associated with proper project management and if you don’t have one people wonder what is going on. The customer gets a sense of security by seeing that particular picture.
- To show dependencies between projects. Although these can be handled in other ways (see above).
- To track activity which is not being done by the Agile Team. Examples include Training, Deployment (if handled by a separate Operations team), etc.
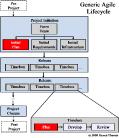
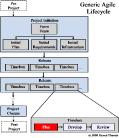
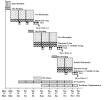
But the Gantt Chart to satisfy these requirements is not the traditional highly detailed chart of traditional project management. I restrict it to one page with the milestones corresponding to phases in the Agile Lifecycle / Agile Heartbeat:
- End of Agile Project Initiation
- End of each Timebox
- End of each Release (which will correspond to the end of a Timebox)
- End of Agile Project Closure
I never include lower level development detail, i.e. I never show User Stories or Tasks on the Gantt Chart. They would be too painful. But I do add external activity like Training and Deployment.
The example Gantt Chart is one that I included in a real proposal. You’ll notice that it is remarkably short of detail but it does show the entire project as a glance so is modestly useful. Most importantly it fulfilled the customer’s expectation to see a Gantt Chart.
References
Agile Manifesto: Principles Behind the Agile Manifesto
Beck, K, & Fowler, M. (2001). Planning Extreme Programming. Boston: Addison-Wesley.
Cohn, M. (2006). Agile Estimating and Planning. Prentice Hall.
Goldratt, E. M. (1997). Critical Chain.
Kerzner, H. (2003). Project Management: A Systems Approach to Planning, Scheduling, and Controlling [8th Ed]. Wiley.
Ohio State University: Office of the CIO
Project Management Institute. (2000). A Guide to the Project Management Body of Knowledge (PMBOK Guide) [2nd Edition]. Author.
Project Management Institute. (2004). A Guide to the Project Management Body of Knowledge (PMBOK Guide) [3rd Edition]. Author.
Schwaber, K., & Beddle, M. (2002). Agile Software Development with Scrum. NJ: Prentice Hall.
Wikipedia: Critical Chain Project Management
Pingback: Agile Project Planning « Olipa kerran Bigdata
Dear Steven,
Thank you for such an insightful summary. Learned so much reading your articles!
Wanted to ask if you could re-upload/share your example of a Gantt chart? The image on the website is very small.
Thank you again for such a brilliant resource.
Regards,
Minti